
Form validation in VueJS
In this article I would like to focus your attention on a JavaScript framework called VueJS, in particular on form validation. I will not go into the details but overall VueJS promotes the idea of minimalism and therefore no validation tools are incorporated in its core. Accordingly, if validation is needed then we include a validation package, if not then the size of our application will be much smaller. At this point let’s finish the introduction and get down to business.
So let’s create a skeleton of the mini-application we will work with. For validation I will use the Vuelidate library. Detailed information about it can be found at: https://monterail.github.io/vuelidate/. Also, for visual decoration I will use Bootstrap 4 styles. A CDN link to bootstrap styles can be found here: https://www.bootstrapcdn.com/ and should be added to the index.html file.
<!DOCTYPE html>
<html lang="en">
  <head>
    <meta charset="utf-8">
    <title>vue-project</title>
    <link href="https://stackpath.bootstrapcdn.com/bootstrap/4.1.3/css/bootstrap.min.css" rel="stylesheet" integrity="sha384-MCw98/SFnGE8fJT3GXwEOngsV7Zt27NXFoaoApmYm81iuXoPkFOJwJ8ERdknLPMO" crossorigin="anonymous">
  </head>
  <body>
    <div id="app"></div>
    <script src="/dist/build.js"></script>
  </body>
</html>
Next we install the Vuelidate library with the following command:
npm install vuelidate –save
After the above is completed, we will see the following in the package.json file in the dependencies field:
"dependencies": {
    "vue": "^2.5.17",
    "vuelidate": "^0.7.3"
}
Now to complete the first section we only need to create a component and connect the library. Thus, main.js will look like this:
import Vue from 'vue'
import Vuelidate from 'vuelidate'
import App from './App.vue'

Vue.use(Vuelidate)

new Vue({
  el: '#app',
  render: h => h(App)
})
And the component will look like the below:
<template>
  <div class="container">
  </div>
</template>

<script>
export default {
  data () {
    return {
    }
  }
}
</script>
At this moment, we finish preparation and move on to more interesting stuff 🙂
Next stage is the preparation of the form to be validated. I suggest creating a form with 3 fields (Email, Password and Confirm password). Such forms are commonly used for registration. After updating the template will look like this:
<template>
  <div class="container">
    <div class="row justify-content-center">
      <div class="col-6">
        <form class="pt-3" @submit.prevent="onSubmit">
          <div class="form-group">
            <label for="email">Email</label>
            <input
              type="email"
              id="email"
              class="form-control"
              v-model="email"
            >
          </div>
          <div class="form-group">
            <label for="password">Password</label>
            <input
              type="password"
              id="password"
              class="form-control"
              v-model="password"
            >
          </div>
          <div class="form-group">
            <label for="confirm">Confirm password</label>
            <input
              type="password"
              id="confirm"
              class="form-control"
              v-model="confirmPassword"
            >
          </div>
          <button
            class="btn btn-success"
            type="submit"
          >Submit</button>
        </form>
      </div>
    </div>
  </div>
</template>
The new things here are @ submit.prevent = ”onSubmit” and v-model = ”password”. The first one is the event listener (here it is ‘submit’) and the second one is a so-called two-way binding. Next we need to process all this and right away we can add the necessary validators. I suggest initially using the pre-installed validators that can be found here: https://monterail.github.io/vuelidate/#sub-builtin-validators and later working on the custom ones. But first things first. In order to use the pre-installed validators they should be first imported like this:
import { required, email, minLength, sameAs } from 'vuelidate/lib/validators'
I imported only the validators I need now: the required field validation, validation of an email, validation of the minimum string length and validation of the string compatibility. This is also a kind of application optimization since nothing extra is imported. As we have already connected the Vuelidate library earlier, now we can use the “validations” object and validate all the existing fields.
<script>
import { required, email, minLength, sameAs } from 'vuelidate/lib/validators'

export default {
  data () {
    return {
      email: '',
      password: '',
      confirmPassword: ''
    }
  },
  methods: {
    onSubmit () {
      const data = {
        email: this.email,
        password: this.password
      }
      console.log(data)
    }
  },
  validations: {
    email: {
      required,
      email
    },
    password: {
      minLength: minLength(6)
    },
    confirmPassword: {
      sameAs: sameAs('password')
    }
  }
}
</script>
I will not focus now on what is happening in the “validations” object but rather explain how to process all this in the template and show it visually. I will take the email field as an example, still for the other fields the process will be the same. Since the bootstrap styles are available, I will use the “is-invalid” class for the form field and the “invalid-feedback” to display the message text. Next, I will add a wiretap for the “blur” event, which will signal that the validation should be done after the focus removal. After all changes are implemented, the email form group will look like this:
<div class="form-group">
  <label for="email">Email</label>
  <input
    type="email"
    id="email"
    class="form-control"
    :class="{'is-invalid': $v.email.$error}"
    @blur="$v.email.$touch()"
    v-model="email"
  >
  <div class="invalid-feedback" v-if="!$v.email.required">Email field is required</div>
  <div class="invalid-feedback" v-if="!$v.email.email">This field should be an email</div>
</div>
The most interesting points here are the binded “is-invalid” class activated by any error in the e-mail field, the system variable “$v” which holds the instance to Vuelidate and the directive “v-if” which enables notification display only in case of a certain mistake. This part is now described so we can look at the last one.
Finally, I want to show you custom validation and an easy way to implement it. As an example we will validate the e-mail field for uniqueness. Generally, we would need to contact the server and react on its response. If the server returns information that such email is already in use, then this should be processed and the relevant information should be communicated to the user. However, since it is time consuming to raise the registration server, I will emulate the whole process. Below you can see what I did:
email: {
  required,
  email,
  uniqueEmail: function(newEmail) {
    if (newEmail === '') return true
    return new Promise((resolve, reject) => {
      setTimeout(() => {
        const value = newEmail !== 'test@nowhere.com'
        resolve(value)
      }, 1000)
    })
  }
}
I emulated the server behavior with the help of “setTimeout” and if the entered email is the same as the predefined (in my case it is test@nowhere.com), then in 1 second the error will be displayed that this email is already in use. This is of course not the most elegant example, but it is enough to understand how the whole thing works.
In order to summarize everything, let’s first see how the code of the component looks like on the whole.
<template>
  <div class="container">
    <div class="row justify-content-center">
      <div class="col-6">
        <form class="pt-3" @submit.prevent="onSubmit">
          <div class="form-group">
            <label for="email">Email</label>
            <input
              type="email"
              id="email"
              class="form-control"
              :class="{'is-invalid': $v.email.$error}"
              @blur="$v.email.$touch()"
              v-model="email"
            >
            <div class="invalid-feedback" v-if="!$v.email.required">Email field is required</div>
            <div class="invalid-feedback" v-if="!$v.email.email">This field should be an email</div>
            <div class="invalid-feedback" v-if="!$v.email.uniqueEmail">This email is already exists</div>
          </div>
          <div class="form-group">
            <label for="password">Password</label>
            <input
              type="password"
              id="password"
              class="form-control"
              :class="{'is-invalid': $v.password.$error}"
              @blur="$v.password.$touch()"
              v-model="password"
            >
            <div class="invalid-feedback" v-if="!$v.password.minLength">
              Min length of password is {{ $v.password.$params.minLength.min }}. Now it is {{ password.length }}.
            </div>
          </div>
          <div class="form-group">
            <label for="confirm">Confirm password</label>
            <input
              type="password"
              id="confirm"
              class="form-control"
              :class="{'is-invalid': $v.confirmPassword.$error}"
              @blur="$v.confirmPassword.$touch()"
              v-model="confirmPassword"
            >
            <div class="invalid-feedback" v-if="!$v.confirmPassword.sameAs">
              Passwords should match
            </div>
          </div>

          <button
            class="btn btn-success"
            type="submit"
            :disabled="$v.$invalid"
          >Submit</button>
        </form>
      </div>
    </div>
  </div>
</template>

<script>
import { required, email, minLength, sameAs } from 'vuelidate/lib/validators'

export default {
  data () {
    return {
      email: '',
      password: '',
      confirmPassword: ''
    }
  },
  methods: {
    onSubmit () {
      const data = {
        email: this.email,
        password: this.password
      }
      console.log(data)
    }
  },
  validations: {
    email: {
      required,
      email,
      uniqueEmail: function(newEmail) {
        if (newEmail === '') return true
        return new Promise((resolve, reject) => {
          setTimeout(() => {
            const value = newEmail !== 'test@nowhere.com'
            resolve(value)
          }, 1000)
        })
      }
    },
    password: {
      minLength: minLength(6)
    },
    confirmPassword: {
      sameAs: sameAs('password')
    }
  }
}
</script>
And, of course, there is the screenshot below showing how it will be displayed for the user.
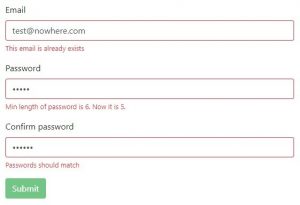
As you can see, bootstrap helped a lot in terms of design, and with small amendments this could even be used on a real project. The final conclusion is that forms validation in VueJS is mostly about knowing which library should be used in which case. Alternatively, the universal Vuelidate combine can be used. Vuelidate is for sure not the only library of this kind but it has many advantages: it’s well documented, easy to learn with built-in validators. Additionally it’s very flexible and optimized. Thank you for your attention, please write your thoughts on this subject in the comments and I hope this will be useful for you.
Origin: www.linkedin.com
Alla artiklar